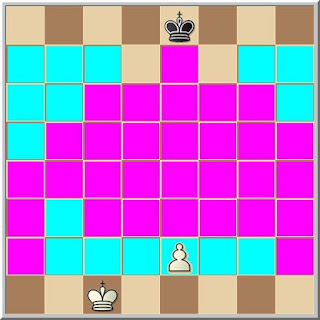
King and pawn vs king, white to move.


The coloured square diagram shows whether the position is a win or draw for white with white to move and with the kings in the same position but the pawn on all the possible squares; cyan are wins for white and magenta are draws. (Ignore the pawn on e2.) Naturally the cyans further up the board are trivial cases where the black king is outside of the queening square of the white pawn, but he ones near the white king are the interesting ones. This diagram illustrates how if the pawn has been extended then it is a draw but if it is in the initial position is can still be won. It is also interesting how b3 happens to also be a win but anywhere else on the 3rd rank is a draw. I decided to look at the winning method for this exact case.
From the diagram position, white is winning and accurate play is necessary. The technique with the pawn on b2 for example is easier because there is far less chance of allowing a draw as most sensible looking moves retain the win, whereas in the current example three only moves in a row are required.1.Kb2The only move that wins.[1.Kc2= e.g. 1...Kd7 2.Kc3 Kc7 3.b4 Kb6 4.Kc4 Kc6 5.b5+ Kb6 6.Kb4 Ka7 7.Kc5 Kb7 8.b6 Kb8 9.Kc6 Ka8 10.b7+ Kb8 11.Kb6 draw]1...Kd7 2.Ka3The only move.[2.Kc3= Kc7 3.b4 Kb6 4.Kc4 Kc6 The black king has opposition and draws.]2...Kc6 3.Ka4Diagonal opposition.[3.Kb4= Draws. 3...Kb6 Black king gets opposition.]3...Kc7[3...Kb6 4.Kb4 Ka7 5.Kc5 Ka8 6.Kb6 Kb8 7.b4 Ka8 8.b5 Kb8 9.Ka6 Kc7(9...Ka8 10.b6 Kb8 11.b7 Kc7 12.Ka7)10.Ka7]4.Kb5[4.Ka5 also wins 4...Kb7 5.Kb5 Kc7 6.Ka6 Kb8 7.b4 Kc8 8.Ka7 Kc7 9.b5]4...Kb7 5.b4 Ka7 6.Kc6 Kb8 7.Kb6 Kc8 8.Ka7Clearly white needs to know his or her stuff for the starting position as the first three moves were only moves. Cases with the pawn on the second rank are more forgiving white does not have to play only moves as much as in the b3 example. 1-0
No comments:
Post a Comment